Installation
TerosHDL can be installed in VSCodium or VSCode. As open source alternative of VSCode we recommend VSCodium. But it works in both with the same functionalities.
Requirements
Before installing TerosHDL, you need to install some dependencies, which are software packages or libraries that the IDE relies on to function properly.
1. VSCodium/VSCode
2. Python3
Install Python3
- Windows Standalone
- Windows Anaconda/Venv
- Linux
- Mac
- 1. Go to the Python website and download the latest version of Python3 for Windows: https://www.python.org/downloads/windows
2. Run the downloaded file and follow the installation wizard. During the installation, make sure to check the box "Add Python 3.x to PATH" so that you can run Python and pip from any command prompt.
3. Once Python is installed, open a command prompt by pressing Win+R and typing cmd, then press Enter.
4. Type python --version in the command prompt and press Enter. This should display the version of Python you just installed.
5. Next, you need to install pip, the package installer for Python. Download the get-pip.py script from https://bootstrap.pypa.io/get-pip.py
6. Open a command prompt and navigate to the folder where you saved the get-pip.py script.
7. Type python
get-pip.py and press Enter. This will install pip on your system.8. To verify that pip is installed correctly, type
pip --version in the command prompt and press Enter. This should display the version of pip you just installed.- 1.click windows and search for "Edit the system enviorment variables"
2.under "System Variables", find
Path and click edit3.click new and add the anaconda path (By default, it should be
C:\ProgramData\anaconda3\)4.click ok and test correct python was choosen, you can do this by opening command prompt and writing python, you should see a python prompt with "Anaconda" mentioned.
- 1.in a folder you want the virtual enviorment to be installed, open command prompt
2.write the following command
python -m venv venv, this will create a folder named venv where the new virtual python enviorment will be located3.next, we will use the command prompt to "Activate" the virtual enviorment, we do this to install packages in the virtual enviorment, you do this by writing the following command:
venv\Scripts\activate.bat, if you see (venv) before the command prompt the virtual enviorment has been activated correctly.4.now we will install the required python packages for teroshdl, we will do this by typing
pip install teroshdl in the virtual enviorment command prompt!- 1.in vscode, open configuration menu of teroshdl
2.under general you should see python3 binary path, under this textbox write the path to the virtual enviorment binary. For example,
C:/tools/venv/Scripts/python3.exe3.after this, teroshdl will use the virtual enviorment as its python tool.
- 1. Open a terminal window by pressing Ctrl + Alt + T or searching for "Terminal" in the applications menu.
3. Update the package list to ensure you have the latest version of the package manager by running the following command:
sudo apt update4. Install Python 3 by running the following command:
sudo apt install python35. Verify that Python 3 is installed by running the following command:
python3 --version6. This should display the version of Python 3 that was installed.
7. Install pip, the package installer for Python, by running the following command:
sudo apt install python3-pip8. Verify that pip is installed by running the following command:
pip3 --version9. This should display the version of pip that was installed.
- 1. Open a web browser and go to the Python website: https://www.python.org/downloads/
2. Download the latest version of Python3 for macOS by clicking on the "Download Python 3.x.x" button. Make sure to download the version that matches your system architecture (Intel or Apple Silicon).
3. Once the download is complete, open the downloaded file and follow the installation wizard. During the installation, make sure to check the box "Install pip" so that you can easily install Python packages.
4. To verify that Python and pip are installed correctly, open a Terminal window by going to Applications > Utilities > Terminal. Type
python3 --version and press Enter. This should display the version of Python you just installed. Then, type pip3 --version and press Enter. This should display the version of pip you just installed.5. If you want to use Python and pip without typing the
python3 and pip3 commands, you can add them to your system path by adding the following lines to your shell configuration file (usually either ~/.bashrc or ~/.zshrc):export PATH="/Library/Frameworks/Python.framework/Versions/3.X/bin:${PATH}"3. Python3 package dependencies
Install Python package dependencies:
- VUnit
- Edalize
- cocotb (optional)
- Windows
- Linux
- Mac
Windows key and R key at the same time, then type cmd and hit Enter. Type: pip install teroshdlCtrl + Alt + T or searching for "Terminal" in the applications menu.. Type: sudo pip3 install teroshdlsudo pip install teroshdl4. Make
You don't need to install Make if you are using Raptor, VUnit or cocotb.
To make sure that TerosHDL is getting your Make binary correctly you need to configure the installation directory in TerosHDL configuration menu >> General >> Make installation directory
Install make in your system:
- Windows
- Windows (alternative method)
- Linux
- Mac
- Open a Command Prompt or PowerShell with administrative privileges.
- Press Win + X and select "Windows Terminal (Admin)" or "Command Prompt (Admin)."
- For PowerShell, right-click the Start button, choose "Windows PowerShell (Admin)."
- Ensure you have Chocolatey installed. If not, you can install it by running the following command:
- Once Chocolatey is installed, you can install make by running the following command:
- Chocolatey will handle the installation process, including any dependencies make requires.
- After the installation is complete, you can verify that make is installed by checking its version with this command:
Set-ExecutionPolicy Bypass -Scope Process -Force; [System.Net.ServicePointManager]::SecurityProtocol = [System.Net.ServicePointManager]::SecurityProtocol -bor 3072; iex ((New-Object System.Net.WebClient).DownloadString('https://community.chocolatey.org/install.ps1'))
choco install make
make --version
1. Install a Unix-like environment such as Cygwin on your Windows system. This environment provide a Unix-like terminal and command-line tools, including Make.
Download and run the Cygwin installer from the official website (https://cygwin.com/install.html). During the installation process, select the packages you want to install, including Make, from the package list. 2. Once you have installed a Unix-like environment, open the terminal or command prompt provided by that environment.
3. Verify that Make has been installed by running the following command:
make -v. This should display the version of Make installed on your system.Ctrl + Alt + T or searching for "Terminal" in the applications menu.. Type: sudo apt install make- 1. Open a terminal window by going to Applications > Utilities > Terminal.
2. Install Xcode, which includes Make, by running the following command:
xcode-select. This will prompt you to install the Xcode Command Line Tools, which includes Make.3. Verify that Make has been installed by running the following command:
make -v. This should display the version of Make installed on your system.TerosHDL installation
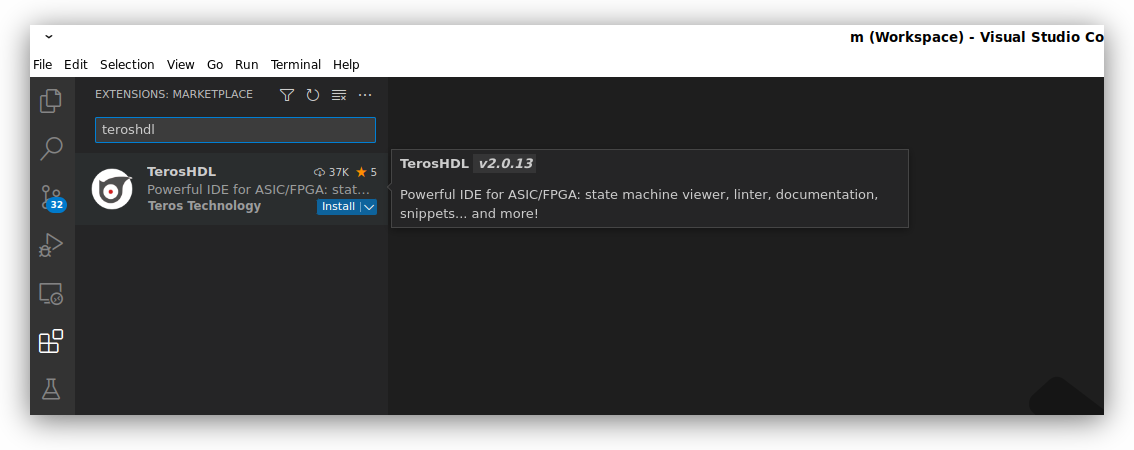
From market
TerosHDL is present in VSCodium market and VSCode market.
The VSX market for VSCodium is a marketplace for VSCode extensions that are compatible with VSCodium, which is a free and open-source version of VSCode that is built from the same source code but without the Microsoft branding, telemetry, and licensing restrictions.
To access the market for VSCodium/VSCode, you can follow these steps:
- Open VS Code.
- Click on the Extensions icon on the left-hand side of the window, or press
Ctrl+Shift+X(Windows, Linux) orCmd+Shift+X(macOS) to open the Extensions view. - In the search bar at the top of the Extensions view, type the name of the extension you want to install. Alternatively, you can browse for extensions by clicking on the "Explore" or "Extensions" tabs.
- Once you have found the extension you want to install, click on the "Install" button next to its name.
- Wait for the extension to download and install. You can monitor the progress in the "Notifications" area at the bottom-right corner of the window.
- After the extension is installed, you may need to reload the editor for the changes to take effect. If so, you'll see a "Reload" button appear next to the extension in the Extensions view. Click on it to reload the editor.
- Once the editor has reloaded, the installed extension should be available for use.
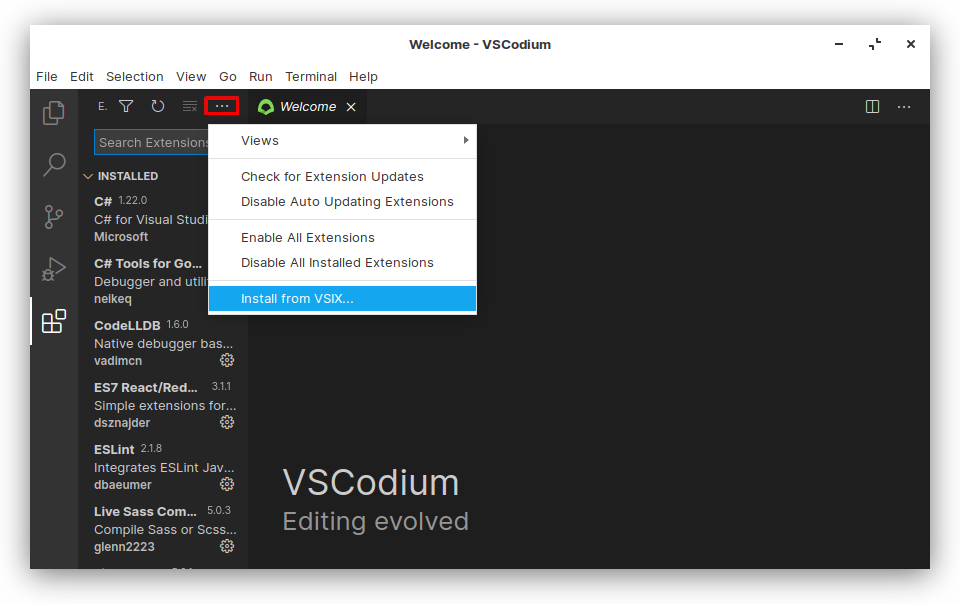
TerosHDL beta version: from VSIX
It is recommended to install TerosHDL from the market.
- Download the VSIX TerosHDL release from https://github.com/TerosTechnology/vscode-terosHDL/releases
- Open VSCodium/VSCode and click on the Extensions icon on the left-hand side of the window.
- Click on the three dots icon on the top right-hand corner of the Extensions pane and select "Install from VSIX..." from the dropdown menu.
- Navigate to the directory where the VSIX file is located and select it. Alternatively, you can drag and drop the VSIX file onto the Extensions pane.
- VSCodium/VSCode will install the extension and prompt you to reload the editor. Click on the "Reload Now" button to reload VSCodium/VSCode.
- Once VSCodium/VSCode has reloaded, the installed extension should be available for use.
Validating Installation
You can validate terosHDL dependecies are installed correctly by using the Check Dependecies, you can find the button in teroshdl under Actions
